
How to Prepare for a Photoshoot on Location (and How NOT to Do a Snowy Mountain Boudoir Shoot)
Updated: September 10, 2026
When you think snow and the great outdoors, a lingerie photoshoot might not be at the top of your mind. But there I was, invited by model and friend Miho-chan for an overnight excursion to the snowy mountain prefecture of Gunma to do exactly that.
It was going to be a first for me, a new challenge, and I had no idea what to expect. I can safely say I wasn’t as prepared as I should have been!
You’ll see the final shots below, of course, and while I’m more than happy with the results, there were plenty of mistakes, mishaps and potential disasters. So read along while I list out the things I would avoid and what I would do better.
You don’t need to be planning a boudoir shoot on a frozen mountain for these lessons to apply. Whether you’re photographing someone around your neighbourhood, taking a client through the city or heading somewhere a little more ambitious, photography is an exercise in planning as much as it is execution. Let’s dive in.
1. Scout your location
If you’re going to shoot on location, know your environment. It’s not always possible to pre-scout with a physical visit, but the better you understand where you’ll be shooting and in what conditions, the smoother things will go. More importantly, you’ll be better prepared to keep yourself and the people joining you safe.
We might not think of photography as dangerous. But things could have gone awfully wrong for us after two hours of hiking, when we reached the top of the mountain and the plan was for Miho-chan to get into lingerie and pose nude in −15°C weather!
For a city shoot, scouting might mean checking where the light falls, how busy a street gets, whether you have room for your equipment, or where you can duck inside if it rains. For a mountain shoot, you’re also thinking about the route, terrain, shelter and the way back down. Same principle, very different consequences if you get it wrong.
Also check whether the location allows the kind of photography you’re planning, particularly if you’re bringing lights, working with a client or need somewhere private to change.
If you can't physically pre-scout, you can find plenty of info online and use things like Google street view to get a better understanding of your environment. In our case, we had found a few blog posts with a lot of information online.
Also, apps such as PhotoPills and The Photographer’s Ephemeris can be helpful for timing the placement of the moon and sun at future locations to get that perfectly timed shot!
2. Prepare for the worst (to achieve your best)
What’s the worst that can happen on a shoot? Prepare for that!
If you’re doing a street shoot around your neighbourhood, that might be different from hiking up a mountain, but at a minimum we should be prepared for the simple things:
Are my batteries recharged and ready? Remember that cold can reduce battery performance, so keep spares warm and dry.
Do I have spare batteries for my lights and trigger too? It’s easy to focus on the camera and forget the smaller things that make the setup work.
Are my memory cards ready, with a spare available? Make sure earlier photographs are backed up before clearing a card.
What about the time of day? Will it be full of people, or will we have the time and space for what we’re trying to achieve?
What about the temperature? If it’s hot and I’m working with a sweaty model, bring water, a towel, a change of clothes or a fan, and plan breaks in the shade. If it’s cold, bring extra dry layers and gloves, and plan somewhere to warm up between shots.
What if the weather changes? Have a covered alternative, an indoor option or a plan to reschedule.
Where can we get help if needed? The more remote the location, the more important the answer becomes.
If your location is more extreme, think about those same points, but be even more considerate and cautious. I didn’t factor in that we would be fatigued after two hours of hiking and already extremely cold. Having the model strip down in those conditions could easily have invited disaster.
We brought a warm blanket that doubled as a prop, and I bought plenty of heat patches. I was very glad to have those. What would I have considered in retrospect? A spare set of gloves, for a start!
By the time I reached the top, the one pair I’d brought were wet and had become frozen icicles, making my hands pretty much useless. The alternative was taking them off to hold my camera, but let me tell you, my fingers were hardly functioning in those temperatures either.
Small essentials such as water, basic first-aid supplies and food deserve space in your bag. Energy bars don’t take up much room and provide a quick power-up on the trail. Charge your phone before heading out, consider backup power, and plan for places without reception rather than assuming your phone will solve everything.
For another winter shoot, I’d also choose a location with a much easier exit and a warm place close by. Once someone starts shaking or struggling with the cold, the priority is stopping and getting warm. Shooting for less than 15 minutes doesn’t make that a safe time limit for anyone to copy.
The CDC’s hypothermia guidance explains warning signs including shivering, exhaustion, confusion and fumbling hands. Suspected hypothermia requires medical attention. That’s a lesson from this particular shoot, but knowing when to call it is part of planning any session.
3. Keep it light
Do I really need five lenses?
Visualise the kind of shots you’re aiming to produce and think about how, and with which lens, you’ll achieve those looks. Carrying a bunch of extra stuff might not be such a big deal if you’re in the city and close to home. On a long hike, unnecessary gear gets burdensome pretty quickly.
You may think you can’t get through the shoot without X, Y and Z. In reality, you can often do more with less. Start with the camera and the images you want to make, then add the photography equipment that actually earns its place in the bag.
That doesn’t mean leaving behind the things you need for the location. Simplify your lenses and accessories before you start cutting warmth, water or emergency essentials. If you’re shooting for a client, also think through what you’ll do if a key piece of equipment fails.
Hopefully these steps help you plan your next outdoor shoot and avoid disappointment—or worse. Now, on to the shots!
The shoot: Lake Onuma and the climb up Mount Akagi
We were young and innocent... little did we know what lied ahead
Our starting point was at the base of Akagiyama where we found a collection of ice fishermen angling for what I learned were small little sardine like fish called wakasagi or Japanese pond smelt on Lake Onuma. It is a caldera lake, or a lake formed in the crater of a volcano.
I quickly learned that this hike was not going to be possible without Crampon spikes. Speaking of preparation, I almost opted not to rent these and if that were the case it would have been near impossible to get to the top and extremely dangerous. One way to feel like a complete noob!
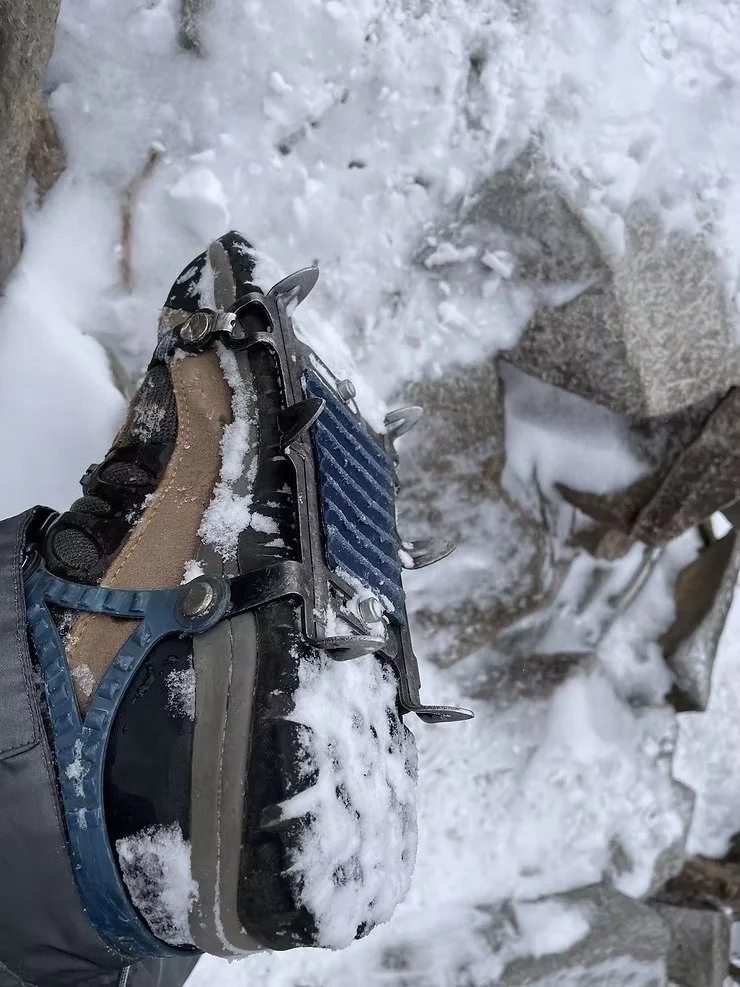
The journey to the top started here. According to our research this climb was supposed to be a beginner friendly hike. We find this claim to be quite suspicious!
After nearly 2 hours of upwards climbing we finally reach the summit and find a charming Tori Gate...a reminder you're on a Japanese mountain afterall!
Two hours of hiking, less than 15 minutes of shooting
When we reached the top, we had to find an appropriate location that was a little off the main path and somewhat flat. We quickly found out that anything off the main path was far from flat and steeply rolled down the mountain. Realising this, we had to settle for a spot just off the main path.
And of course, just as we were about to start and Miho-chan had gotten into her lingerie, a group of Japanese hikers started to roll in one by one! This was equally funny and awkward because we’d hardly encountered anyone on the way up and thought we’d have the place to ourselves.
They absolutely knew, with Miho-chan’s exposed bare legs under her big parka and my light stand set up, that we were not usual hikers. With a sly smile and a quick “頑張ってください!” — good luck! — they were off, and finally we could start.
With the freezing temperatures, my fingers like icicles and, more importantly, poor Miho-chan freezing her tail off and starting to shake, we wrapped up in less than 15 minutes. Yes, 15 minutes!! All the planning, hiking and expense for what turned out to be the quickest shoot of my life!
My main concern was getting her warm. Looking back, the shaking was a reason to stop and seek warmth, rather than rush to squeeze more photographs in. That’s one part I would handle differently.
The results: red against the snow
For the first set, we used red lingerie and a dark parka to contrast against the snow. Gotta say, I’m really happy with that choice. The thing that made these shots that much more magical was the frosted bushes and leaves around us at the top of the mountain. They added a texture we hadn’t had down at the base.
The second set and the edit
For the second set, Miho-chan posed nude with a white fur blanket, giving us a completely different look from the red lingerie against the snow.
There was quite a bit of post-processing, primarily to put colour back into Miho-chan’s skin and lips, which were looking quite blue and pale in the original shots. I’m more than happy with how the photographs turned out considering how quickly we had to work, and I really appreciate the trust she put in me.
Looking back, those signs of cold are also a reminder that getting the shot and looking after the person in front of the camera have to go together. Editing the colour afterwards doesn’t change the conditions we were shooting in.
And one last signature shot of Miho-chan! Love it!
We wrapped up quickly and started our descent down.... slowly but surely. This gives a pretty good idea of what the path looked like downhill.
And finally that's a wrap! お疲れ様です!かんぱい!! Hope you enjoyed the write up. It was definitely an experience I don't think I'll ever forget but next time, I think I'll rent a car ;)
A quick checklist for your next location photoshoot
Before heading out, ask yourself: do I know the location and light? Are my batteries and cards ready? Have I checked the weather and crowds? Does everyone know the plan? Have I packed what we actually need? And what’s our backup if something changes?
It applies just as much to a portrait session around the neighbourhood as it does to something more adventurous. Hopefully my mistakes save you a few of your own!
Thanks for reading! Let me know what you thought of the shoot, or what you always pack for a location session. If you’d like to plan a shoot together, get in touch.
For a different kind of preparation, see the lighting setup from my studio shoot with Gongon.
Stay creative (and stay warm!)